Failbread, and other tales of domesticity.

I found some french flour at the local farm shop, which made me decide to make french bread. And I did (several months later). It turned out really nommy, but I was slightly afraid of breaking my mixer, and I couldn’t knead the dough by hand unless I wanted to suffer for it for days. So I decided to try a no knead recipe for my next attempt.

I used this recipe, pretty much, after reading a few things online and deciding to change it up a bit. My dough was too wet after the, hmmm, 16 hours it spent rising, so I used a wet spatula to try and fold it over in its bowl, then gave up and dumped it straight into the bowl with the floured towel. Then the plans went a bit wrong, i put it in the airing cupboard just before my parents came over to take me to the garden centre, thinking I’d be back in time to get the oven hot for it to go in after 2 hours. Well, i forgot that ‘do you want to go to the X’ from my dad, means ‘do you want to go to the X and then the pub’,  so we were out considerably longer than expected. When i got home the dough had fallen inexctricably in love with my teatowel, despite the copious amounts of flour used. So i just dumped it in the cold cast iron pot, pulled as much as i could off the towel and chucked it on top, then stuck it in the cold oven. I turned the oven to 230 degrees and set the timer for 30 minutes. After 30 minutes i removed the lid and stuck a thermometer into the dough. I have no idea how long the next stage took, maybe 15 mins, but when the internal temp of the bread reached 99 degrees, I took it out.

Looking good!
failbread3

Then. I looked over to my left and saw the untouched roll of greaseproof paper. I had PLANNED to put some in the base of the pan to stop it sticking. or at least some flour, but in my teatowel unsticking frenzy, i forgot.

Still looks pretty good, right?
failbread4

Untiiiiiiiiiiiiiiiiiiil
failbread2

YES MY BREAD HAS NO BOTTOM SHUT UP. There was no way in hell i was getting the thing out of the pot, so I waited until it was cool and then realised i had to sacrifice the bottom crust.

failbread1

Ignoring that huge fail though, it looks pretty good, really light and airy, tastes like a cross between ciabatta and french bread, but with the BEST CRUST EVER. Seriously, it’s incredibly delicious. Next time I will use a liiiiiittle less water, remember the damn greaseproof paper, and probably borrow a smaller casserole dish from my mum so it makes a taller loaf. Oh, and try not to ruin any teatowels. Still, failbread is yummy, so I’m happy.

Another fail i experienced lately was that my beans didn’t grow. Considering the seeds were 10 years old, I pretty much expected it. So today i bought some dwarf french bean seedlings, which are now happily sharing a bed with my peas.
vegmay3

The tomatoes I am growing from seed did rather too well, i have 20+ plants, but i am expecting at least a few cat-related losses. The watercress in the front large pot has suffered at the paws of mummycat, and the carrots in the back pot have been sat on a couple of times too. Still, stuff is growing. There’s 4 chili plants in there too, which are doing very well.
vegmay2

The courgettes are getting biiiig, and i got a couple of tomato plants from someone down the road (one Alicante, one Gardener’s Delight) for some variety, as the ones I’m growing are all Moneymaker.
vegmay1

And fiiiiiiiiiiiiiiiiinally. The most unflattering photo of me EVER EVER EVER.

newdress

I finished this dress the other day. The top is based on this pattern but at a tighter gauge because I wanted to use a 100% silk yarn and knew it would stretch, and then i added the skirty part. I don’t like orange, but i had 4 skeins of Debbie Bliss Pure Silk in orange that I bought aaages ago cos it was cheap. I thought i actually had 5, but maybe one has gone on a stash adventure. I also had a skein each of the pink and purple, so made that hideous creation. AND TODAY I DYED IT. I was going to dye it red then overdye it with black, but i decided i liked the red as-is, so it can stay this way for at least a little while until i am bored with it. Red is notoriously hard to photograph, but here it is, it’s a really bright yummy cherry red colour.

ruffles

Once it’s dry I’ll beg Gren to take a pic and hope I don’t look as chubby as in the above webcam pic. I may also have to sew an underdress thingy for it, cos it is raaather nippletastic, and while i have no qualms normally about my nipples showing through my clothing, this is a little much even for me.

I did it!

Quilt top is finished, with considerably more cat interference. but it’s ok, cos it’s doooone. There are a few mistakes, the piecing errors are due to me changing my mind on the design half way through making it, and the sewing errors are because, well, i can’t sew. But it mostly all lines up, and i’m really happy with it, to the extent that i look at it and can’t actually believe that I made it.

Now to learn how to quilt and bind and all that other fun stuff.

quiltfinished

Crazy hour. It’s like happy hour with no booze required.

I really really should have remembered. Every evening at around 9 is crazy hour in my house. British summer time only started yesterday, so i guess their internal clocks were still a little off. It mostly involves the cats tearing round the living room trying to break the sound barrier and destroying everything in their way. Often it involves one of them ‘hiding’ under the throw over the sofa and being attacked by another. It is generally amusing.

Tonight, it was less so. I finally got round to working on my quilt again, and after sewing a few bits together today, I had a nap, then decided to press them ready for the next joining stage, and lay them out so I could see how big it was going to be and work out whether i was going to sew them together as planned, or change it up a little.

It was going pretty well, all the pieces were laid out, so I decided to get the camera. At some point between walking upstairs to fetch the camera, crazy hour began. I came downstairs to find this:

argh3

argh1

I must say it was only babycat and mummycat involved this time, Snargle has been asleep on top of my wardrobe for at least 4 hours. I think she is saving up her energy for a 4am mountaineering expedition across my desk. After the crazy cat train made its way noisily upstairs, I thought I was safe to start again. I was wrong. I got half way through before they reappeared and trashed everything again.

BUT I WON. Because, as yet, cats are unable to get inside my photoshop.

option1

option2

option3

option4

Now I just have to decide which of these layouts, if any, I want to use. The pros of the last two are that it’ll probably make it large enough to cover my bed without me needing to cut more strips to make into yet more squares, and it makes it less eye-searing to look at. The cons are that I will need to buy more fabric (not a huge issue as i need to go to the shop for more thread tomorrow anyway), and i’ll have to figure out whatever magic method is used to sew long strips between panels.

It’s that time of year

Well, it’s been that time of year for a while, but I’ve mostly been in bed for the last 2 weeks cos I had a horrible cold. Now I’m just slightly coughy, I thought it was time I got on with stuff I’ve been putting off. So I cleaned out the chickens, sorted out the big bin I store the feed/corn/straw/medicine in, and started on the veggie patches. The furthest one in the pic had awful soil in last year, so I grew potatoes to break it up, which seems to have worked. The other 2 weren’t so bad, but were very weedy when i got to them today, so i dug them as best as i could, and spent most of my time just sitting on the edge of the bed pulling weeds and squishing lumps of soil with my hands. Most of the raspberry plants have survived, but only 3 strawberries made it. Before I plant this year I’m going to build a fence so the chickens can’t sit on or dig up everything. And when I say ‘I’, I mean, hope gren and or my dad will help me.

vegbeds

Every time I turned round today, I had a row of chickens following me. I kept telling them not to eat ALL the worms, but I don’t think they listened.

chooks

Before I got ill, I discovered the eye-searing Oranje on Knitty. Orange is SO not my colour, but I decided I had to knit it. I am trying not to buy yarn, so I had to knit from stash. I chose Faithful Beauty Bugga! for the main colour, and a green and a blue for the CC’s. It knitted up SO fast, and although it was my first project involving steeks, it was all very easy and uneventful. I put plenty of notes on my rav project page if anyone else is thinking of making it and is unsure of anything. I mostly followed the pattern, but made the collar a little shorter and did the bands differently as I’m going to be using a zip rather than buttons. Currently the zip is tacked in place, awaiting a battle with the sewing machine. Here’s a zipless pic.

fi2

The pattern looks a little daunting because it’s so long, but that’s a good thing, because it means it’s really clear and easy to follow. HUGE props to the designer for writing such a good pattern, and for generally being an awesome person. This is the first colourwork I’ve done on a garment (other than little things like socks, gloves, and hats), and the charts were easy to follow, easy to remember, and even the few rows that involved 3 colours in one row weren’t too traumatic. I love it so much I’m considering making another in worsted/aran weight so I can wear it as a jacket.

Dear sewing machine. suck it. love vampy

As I have the memory span of a goldfish, I decided I wanted to make some dresses. I KNOW I am shit at sewing, but somehow a combination of forgetting how much I whined last time, desire to have pretty dresses, and pretty much complete denial that there is something I am useless at allowed me to think I can make myself a dress.

I bought this dress a while ago, and I LOVE it. But I don’t really like the fact that it’s a halterneck, and the net is itchy. A sensible plan would have been to make an underskirt and deal with the halterneck, but well, that was sensible, so instead i decided I will make a similar dress based on this shape but with real straps and no net….and if i do make a petticoat for it to add volume, it’ll be from non-itchy net.

newdress

I bought pretty fabric with blueberries on, partly cos it was pretty, and partly cos it was cheap. I forgot to photograph it though, but well, it has blueberries on, use your imagination. Ok, someone on rav asked for a pic, so i guess you get to see it too. Here, blueberries.

blueberries

Being a cheapass with a strange body shape, I gave up fairly fast on the idea of finding a pattern that would do what I want (seriously ebay, fucking £15 for a vintage pattern, REALLY??)…I may consider spending that on a pattern that I knew would actually fit me, but seeing as I’d have to adjust it in lots of places, £15 can fuck right off. Hell, that’s more than the fabric cost.

So I sat on my living room floor with a couple of dresses for inspiration, and approximately 12 miles of muslin. I did some tracing and highly technical drawing in biro, then a bit of cutting and pinning, finally I actually did some damn sewing, and I came up with this:

icansew

After a contemplative nap, i realised i didn’t like those straps, so i took it apart and redid it, and came up with this:

icansew2

It looks a little crappy cos it’s big on the ribcage and the straps are too long, but on the real thing i will actually measure and fix the straps myself rather than getting gren to do it, and the back will be smocked or shirred or whatever the correct technical term is for ‘made elasticy so it fits without me needing to subject myself to the trauma of trying to sew in a zip’. I am hoping that this, and the use of a fabric that is considerably heavier than muslin will mean that the real thing will fit better and look better. At the very least, at least my nipples won’t be visible through it.

I have defeated you in round one of this battle sewing machine, please play nice tomorrow when i begin work on the real thing. Thank you.

batcat and catbatt

Whenever I groom my cats, unless the bin is right next to me to throw away the fur, I find myself spinning it with my fingers, then twisting it up and plying it back on itself, over and over until i have a short thick length. Which i then throw to the nearest cat who plays with it excitedly. Oh, except that one time that i wrapped some wire round it and Gren and Wormy played around with creepy cat fur handlebar moustaches. So a while ago I decided I wanted to spin some proper yarn out of cat fur, so i could knit it into a cat toy. I mentioned this wish to my dad, and he started collecting the fur from his cats.

Last week he remembered to give me his collection. 26g of it. It’s been kept in a plastic baggie, so it was pretty compressed in the photo, but trust me, that’s a LOT of cat fur.

catfur

I didn’t want to spin it on its own because the ends seemed a little spikey, and it wouldn’t make a very good yarn anyway, as it’s got no crimp, so I decided to blend it about 50:50 with wool, and ended up choosing some humbug BFL that was similar colours. I made a few rolags before I realised I don’t particularly like hand carding, so did the rest on the drum carder. After 3 passes it was pretty evenly blended. Another couple would probably have made it super smooth, but I don’t mind if it’s a bit lumpy and bumpy.

catbatt

I decided that there is way too much there for just a silly toy mouse or something, so I’m instead going to make a stuffed toy kitty as a present for my dad. Hopefully he’ll appreciate it as something to remember the kitty who contributed most of the fur by, as she died a few months ago, rather than thinking ‘ew gross’.

I am going to wheel spin most of it, but I was feeling too tired to sit at the wheel tonight, so I spindle spun a little of it in bed. It’s actually surprisingly soft and the spiky ends of the fibres aren’t as noticeable when spun, though this may well change when it’s plied.

catyarn

It’s not the nicest or most fun thing I’ve ever spun, but it’s not difficult, and it’s certainly interesting. Turtle finds it especially interesting; while i was carding the rolags she came and put her head in the bowl of fibre and was sniffing really deeply with her mouth open. After making a handful of rolags I realised I needed a nap, and later this evening gren noticed one of the rolags was a little messed up and sitting at the end of my bed, so she must have liked it so much she stole it to play with.

Aaaaaand now, batcat! Completely unrelated to the above, but it made for an awesome title, and I like this pic so I’m going to share.

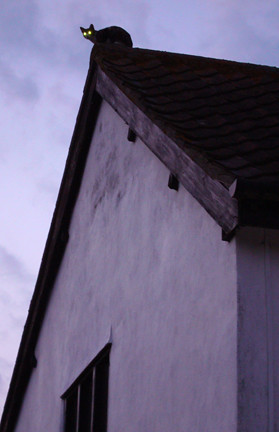
Turtle’s brother lives with my parents. He has learned that they have bats living in their roof. He has also learned that if he sits really quietly on  the roof at dusk, he can hear them coming and catch them as they fly out. It’s really fucking high, I have no idea how he manages to get up there, but he’s super cute. There was a period of about a week when he brought them a dead bat every single night, but I think he’s got bored of that now, which is good, cos bats are so awesome and soft and cute, and don’t deserve to be nommed by naughty cats.

batcat

Even more unrelated to the above, I read a thread on LSG earlier that was talking about disgusting things found in kitchen cabinets, and I remembered that there was a jar of ‘seafood salad’ in my fridge that Nik had bought for Alice about 5 years ago when she was in her ‘eating gross things and blogging about it’ phase. I bravely opened it (in the garden in case it smelled gross), and these two little cuties were in there. I love mini squids!

squids copy

little bunny foo foo

I can’t sew. Imagine if a monkey were given a sewing machine. I’m not that bad. But like, if it were a genuis monkey who’d spent its life working in a sweatshop in order to feed its monkey babies..it would probably be better at sewing than me.

But but but i can knit. and i can seam knitted garments AWESOMELY. and i can do spinning and felting and dyeing and anything else related to yarn and fibre. So sometimes I forget that I CAN’T FUCKING SEW.

A couple of years ago, Nik asked me to make him a little bunny foo foo outfit for his lenore doll. I agreed, and bought the fabric and looked at it and stroked it and procrastinated, then i put it in a box. It’s Nik’s birthday soon, and he is the hardest person on the planet to buy for, as he buys every single thing he wants (and lots of things he doesn’t want), and somehow crams them into his 2 bedroom house in boxes and boxes lining the walls. I try to avoid adding to his mole-man-ness, as when he runs out of space things mysteriously appear at my house. He was getting rid of some garden stuff a few weeks ago, I asked if he had a hoe (and not JUST because the name amuses me). I am now the proud owner of 2 hoes, a spade that is different to the 2 spades i already own but i forget how, 3 garden tables, and a green trolley thing on wheels that i think is meant for planting grass seed or fertilising the lawn or some shit. So when he said he didnt know what he wanted for his birthday, and i didnt know what i could get him that would be useful, appreciated, and not mean that something else from his house had to come live with me, I decided i would make this outfit.

I can kinda sew from a pattern, but obviously there is a gap in the market when it comes to patterns for bunny outfits for dolls with vastly oversized heads. Then i had the dilemma of whether to make the costume from the comic book or the one from the animation. In the end i chose the latter cos there are better pics of it on the internet, and the comic book one would have needed a giant oversized zip that is probably not something that has been invented yet.

So over the last few days I’ve been drawing and cutting and making templates out of muslin and sewing and sticking pins into my hand and whining. I have NO idea what was going through my head when i picked the fabric. I can only assume it was ‘wow, this is cute and soft and the right colour pink and it’ll make an awesome bunny outfit and doesn’t cost a gazillion pounds a metre’. The fact that I’d have to SEW it was clearly not at the front of my mind, cos it was horrible. It’s some sort of fleecey stuff but not really fleece and it’s stretchy and really thick and i couldnt do 1/4″ seam allowances cos it all bunched up under the presser foot and wahhhhhh. Oh, and making the ears stand up and not be all floppy. NIGHTMARE.

BUT, tonight i finished it. Vampy 1, sewing 0

lenore

The wheel spins!

It is pretty and almost finished!

wheelnew1

In this context, ‘almost finished’ means ‘actually works and spins yarn, but still has a buttload of work that needs doing before it looks how i want’.

wheelnew3

I have issues with painted wheels. I LOVE the idea, and then I see pictures from people who’ve just painted random sheep or flowers or cats all over them, and that seems to hurt my brain. I think the design should fit with the shape of the wheel, flow with it, add to it, rather than look like a child had stuck stickers all over it. I am well aware that I may be alone in my thinking, and this isn’t a slight at all on people who DO like that sort of thing, but well, i think most painted wheels look ugly. Yet still the idea appeals to me.

I am pretty happy with how this is coming along, it looks all pretty and old and….argh i don’t wanna say it….goddammit, ok, i’ll say it….steampunkish* and certainly much better than the orangey varnished thing it started out as.

And it actually makes yarn, see?

wheelnew2

Okay, so i didn’t make MUCH yarn because the flyer only has two hooks on and the band only fitted onto the biggest whorl, and there’s a bit of a wobble on the wheel as i couldn’t put the pin back in (don’t worry, it wasn’t another huge drama, just Gren is stupid and thinks 1am is the time to be asleep, so hitting things with hammers wasn’t polite). But it made yarn nonetheless, and it actually spun amazingly smoothly and quietly considering it has the old solid wooden bobbins.

Now all i need to do is:

– hit it with a hammer!

– replace flyer hooks with pretty new shiny ones

– replace driveband with one of the cool stretchy ones (which i have somewhere, just need to find)

– replace tension spring with one that isn’t all fucked up, and replace the cord with something less irritating than that stupid monofilament crap it comes with.

– replace head of tension screw and mother-of-all-lifty-thingy-screw with pretty brass ones

– do something with the treadle assembly. Probably a brass plate to cover the treadle, or maybe a couple of brass rods. My abilities (or lack thereof) in remembering to buy things, finding things locally so i dont have to waste a ton on postage, welding, and actually getting on with stuff will all come into play here. I may well just end up painting it with the pretty brass paint and calling it a day.

– make a matching orifice hook

– decide whether to do anything with the bobbins and lazy kate, or just not bother seeing as the bobbins are the old solid wooden ones and could do with being replaced with the ones with plastic bearings anyway.

*omg i hate the word steampunk. I LOVE the aesthetic, but I hate the whole ‘imma stick some bits out of a clock on this piece of plastic crap and then sell it as a steampunk pendant’ shit that seems to be prevalent these days. It makes me cry emo tears, so even using the word with -ish at the end makes me feel dirty. *shudder*. I will have to go look at regretsy for a while until i feel clean again. Hmm, on second thoughts, that totally won’t work, but i will go look anyway because it is hilarious.

How to spin coils, an almost-tutorial

This is a lazy post. I keep thinking I should write more tutorials, but then I lack the motivation and extra hands to take step by step photos, so I just post vast swathes of text on rav, and the next time someone asks the same question I end up hunting through my previous posts. This is beyond tedious, as I have over 20,000 posts, most of which are completely stupid, and contain words and phrases such as ‘zombie apocalypse’, ‘sandy vagina’ *, ‘mmmm boobs’, and ‘fucking cat, imma kill her’. They probably weren’t that interesting or amusing the first time round, and they are even less so the second time, so even using rav’s awesome search, it becomes hard work.

Today, someone asked a question about spinning coils, and i provided a suitably verbose answer, so I decided to paste it all here, partly so I can refer people straight to this post without having to search my history, and partly so I can link unsuspecting people to a blog post that contains the word ‘vagina’ several times.

The first thing to note is that there are two types of yarn that are referred to as coils.

coils1

coils2

The first pic is what most people mean when they talk about coils, it’s just a normal 2 ply yarn with the odd coiled bit in. The second is referred to in the spin-off article mentioned above (Winter 2009 edition) as ‘supercoils’. They both use similar, but slightly different techniques.

Yarn 1
For this type of yarn you want to spin 2 singles from the same fibre. The singles need to have a LOT of twist, far more than if you were going to make a normal balanced 2 ply. I didn’t use enough twist on mine, so its not as tight as i’d have liked. Slightly thick and thin singles are good for this as the thinner areas help the coils to ‘grip’ better rather than stretching out and sliding around, but big fat lumps should be avoided if possible as they don’t look so pretty if they are on the coiling single, and will make the yarn fall apart if they are on the static one.
– When you get to plying, use a low-medium ratio, and a moderate take-up
– position one bobbin to either side of your body. In an ideal world they would both be on tensioned lazy kates to make the crazy amount of singles twist easier to deal with, but if this isn’t possible, I’m sure you can work something out.
– start off by holding both singles at around a 45 degree angle to straight (this is what i wrote, but i actually meant 45 degree angle to each other, either side of straight. So  a 22.5 degree angle to straight i suppose. Clear? no? well just spin a 2 ply for a bit and ignore me), and spin a section of standard 2 ply yarn.
– when you want to make a coil, bring your left hand down so the left single makes a straight line to the orifice, and move your right hand up, so the angle between the two is just shy of 90 degrees. Hold the left one tight and allow the right single to wrap round it. When you’ve got enough wraps, let go of the right hand single, and push it up the left one that you are still holding taught. This will make a lumpy coiled section.
– put your hands back to their original positions and spin some more normal 2 ply
– make another coil as above, this time reversiving the jobs of the left and right hands
– repeat until you are done and marvel at your awesomeness
This method of changing which singles stays straight and which one wraps means you should end up with a balanced yarn, and that if your singles are of the same length, you won’t end up with too much of one left over.

Yarn 2

This is the sort of yarn for which you need a different type of core, and you only need one singles to work with. I used the leftovers from my first yarn, but ran it through the wheel again to add more twist, as i knew there was nowhere near enough.

For the core, you want something that is reasonably thin, and very strong. Lots of people like to use crochet cotton, but i prefer something with a bit more grip that’ll hold my coils in place a little better, so i used some silk noil yarn that i had on a cone, i think it was meant for weaving.

When you are spinning this sort of yarn, the core remains static and all the wrapping is done by your pretty singles, which means a lot of twist builds up in the core yarn. You can spin it onto a bobbin first and guess the amount of twist you’ll be taking out to get an even yarn, but i had no idea, and know it’s always more than i thought, so i went with the alternate method of letting the twist out periodically as i was working.

– take your core yarn, and wrap it onto something that can hang freely and untwist while you are spinning. The spin-off article above uses a drop spindle, but that doesn’t work so well for me as it hits on the edge of the sofa/floor as i work. I found a suitable stone in the garden and wrapped several metres of the core around this, then secured it with a couple of half hitches.
– you’ll want to use a similar take up and ratio to the last yarn, or once you get good at pushing the coils up you may want to up the ratio.
– attach both yarns to the leader, hold the core yarn taught in your left hand, and the wrapping yarn in your right hand (with the bobbin on a lazy kate to your right)…or the other way round if you feel more comfortable that way.
– holding the core yarn tight and the wrapping yarn at almost 90 degrees to it to the right, treadle and allow the singles to wrap around the core. When you’ve got a few inches done, stop and push the singles up the core to make a solid wrapped section.
– There will be a fair amount of twist in your core now, so make sure your stone/spindle is hanging freely and can untwist this extra twist on its own….it might need a bit of a helping hand.
– repeat. a lot. alternating between spinning to wrap the yarn on, pushing it up, and releasing twist from the core
– when your spindle/stone is right up near your hand, let a little more core yarn out and keep going.

This yarn takes a long time to spin, and uses a lot of singles for a very small piece of yarn…but it’s so pretty!

I am plotting in my brainmeats a reworking of this post with more pictures to make the instructions more clear, but for the time being, this will have to do.

* in the interests of science, I did a search. I have used the the words ‘sand’ and ‘vagina’ together in 9 of my 20482 posts, and the word ‘vagina’  (or posted in a thread with vagina in the title) in 89 of them. Do you now see why I don’t want to search my post history?

wheel update

I worked on the wheel a little more today. Sanding the single coat of varnish on this was a lot easier than the gazillion layers on the last one, so I didn’t bother getting more paint stripper. I started painting the wheel as I’d planned, and decided to take some pics…and then I realised i very rarely share my WIPs unless they are yarn related….which is kinda stupid. I’m happy being all like ‘hey, see this dead jellyfish with needles poking out of it? well, in several months time, it will be a beautiful lace shawl!’, but when it comes to something i’m painting, i get all ‘noooo, not finished, no-one must seeee’. I do not know the reason why, but to buck this trend, here is the wheel as it currently looks. It needs more coats of paint and a different colour paint and generally just MORE, but its getting there.

wheelbrass

I was initially considering taking the wheel itself apart and using brass rods instead of the spokes, and replacing the treadle with a brass plate (cos it’s plywood, so even with staining it’s not gonna match the rest of the wheel). Then i realised that would be an all-round Terrible Idea, as I am not good enough at precision work on the lathe to be able to get the spokes completly identical, and then attempting to take apart a glued together wheel and get it reassembled so it spins true and doesn’t wobble would probably result in disaster, and the desired end result is mostly to have something that actually spins, as well as looking pretty.

While taking the pics, i realised that newcat was sleeping on the sofa behind, so i got a sneaky shot of her too.

newcat

Also, I was going through some old pics today. The original thinking was to see if an old RAF base i photoed last year would be suitable for a knitting photoshoot, but I have long since forgotten which garment I was considering, or whether it was just a hypothetical future shoot when i’ve actually written up a pattern.

Sadly i couldn’t get as many photos as I wanted, as while we were there a man with a gun came and told us we were trespassing and should leave. I tried the whole ‘but i’m only taking photos, and it’s so prettttty’. He informed me i might get hurt, and didn’t seem to be interested that i didnt care or wouldn’t sue him or anything.

Oh, on rereading that it sounds like we were on a working base…what actually happened is that we went on a weekend, when this long-disused area becomes an airsofter’s paradise, so about an hour into our visit lots of teenage boys in combats appeared running around shooting each other with bb’s.  It wasn’t like I was arguing with someone with a real gun or anything! So next time i return it will be during the week, when hopefully no-one else will be around, cos this place was pretttty, and full of super super cool stuff.

uw5

uw4

uw3

uw2

uw1

eek, no time to proof read, i am late for an appointment killing bad guys on the internetz. if it makes no sense, just guess what i was trying to say, maybe you’ll come up with something much wittier than i managed